Deploy your ML model into production🔗
Warning
Ensure that you are running on the latest codespace which was updated today. Do not use previous codespace of the last day of classes.
Objectives🔗
By the end of this workshop, you will be able to:
- Explain APIs and microservices - Understand what an API is and why we separate frontend from backend
- Run multi-container applications - Use docker-compose to orchestrate services locally
- Deploy to Cloud Run - Use the gcloud CLI to deploy a container with a public HTTPS URL
- Connect distributed services - Point a local frontend to a cloud-hosted backend API
Workshop Overview🔗
We will convert this notebook into two containerized services:
- A backend server that receives images and returns YOLO object detection predictions
- A frontend UI that lets you upload images and visualize the predictions
The Docker images are pre-built - this workshop focuses on understanding the architecture and deployment workflow.
What we will cover:
- Key concepts: APIs and microservices
- Testing the backend locally
- Testing the frontend locally
- Using docker-compose for multi-container orchestration
- Deploying the backend to Google Cloud Run
- Connecting everything together
1 - Key Concepts🔗
Before diving into the hands-on, let's understand two important concepts.
What is an API?🔗
An API (Application Programming Interface) defines how software components communicate. For web applications, this means:
- Client sends a request: HTTP method + URL + optional data
- Server processes and responds: Status code + data (usually JSON)
In this workshop, the backend exposes an API with endpoints like:
| Endpoint | Method | Input | Output |
|---|---|---|---|
/health |
GET | None | "HEALTH OK" |
/predict |
POST | Base64 image | {"detections": [...], "time": 0.5} |
The frontend doesn't need to know how the model works - it just sends images and receives predictions through the API contract.
Why Microservices?🔗
Our application has two components:
| Component | Role | Technology |
|---|---|---|
| Backend | Receives images, runs YOLO model, returns predictions | FastAPI |
| Frontend | User interface for uploading images and displaying results | Streamlit |
Why separate them instead of one monolithic application?
- Independent scaling - The backend needs more CPU/memory for ML inference; the frontend is lightweight
- Independent updates - Change the UI without touching the model, or vice versa
- Technology flexibility - Use the best framework for each job
- Team autonomy - Different developers can work on each component
When to use microservices
Microservices add complexity (networking, deployment coordination). For small projects, a monolith is often simpler. We use microservices here to demonstrate the pattern you'll encounter in production systems.
2 - Setup🔗
Select your GCP Project🔗
Select your personal Google Cloud Platform project (the same one from previous sessions).
Start your GitHub Codespace🔗
If you already have a GitHub Codespace from previous sessions, relaunch it from the Codespaces interface.
Otherwise, start a new one from https://github.com/fchouteau/isae-cloud-computing-codespace

Verify gcloud configuration🔗
gcloud config get-value project
If not configured, run gcloud init as you did in the previous session.
Navigate to the workshop folder🔗
cd be-ml-deployment
ls
You should see:
be-ml-deployment/
├── backend/           # FastAPI server with YOLO model
├── frontend/          # Streamlit user interface
├── docker-compose.yml # Multi-container configuration
└── test_images/       # Sample images for testing
3 - Understanding and Testing the Backend🔗
The backend/ folder contains a FastAPI application that serves the YOLO object detection model.
REST API Basics🔗
Before exploring the code, let's understand routes and HTTP methods - the building blocks of REST APIs.
A route (or endpoint) is a URL path that your server responds to. Each route handles a specific action:
| Route | Purpose |
|---|---|
/health |
Check if the server is alive |
/predict |
Send an image and get detections |
/models |
List available YOLO models |
Each route responds to specific HTTP methods (also called "verbs"):
| Method | When to use | Example |
|---|---|---|
GET |
Retrieve data (read-only) | Get list of models, check health |
POST |
Send data to be processed | Upload image for prediction |
PUT |
Update existing data | Update model settings |
DELETE |
Remove data | Delete a saved result |
For this workshop, we only use GET (to check health and list models) and POST (to send images for prediction).
Explore the code🔗
Open backend/app.py and look for:
- The FastAPI app declaration
- The
/predictroute - receives an image, runs inference, returns detections - The
/healthroute - simple endpoint to check if the server is alive
How FastAPI declares routes:
FastAPI uses Python decorators to turn functions into API endpoints:
@app.get("/health")       # GET request to /health
def health():
    return "HEALTH OK"

@app.get("/models")       # GET request to /models
def get_models():
    return ["yolo11n", "yolo11s", "yolo11m"]

@app.post("/predict")     # POST request to /predict
def predict(request: PredictRequest):
    # process image and return detections
    return {"detections": [...], "time": 0.5}
The decorator @app.get("/health") tells FastAPI: "When someone sends a GET request to /health, call this function and return its result as JSON."
What is FastAPI?
FastAPI is a modern Python web framework for building APIs. It automatically generates interactive documentation from your code and validates request/response data using Python type hints.
Run the backend locally🔗
Launch the backend container:
docker run --rm -p 8000:8000 europe-docker.pkg.dev/isae-sdd-481407/isae-sdd-de-2526-docker/yolo-v11-backend:1.0
This starts a container exposing port 8000.
Test the API🔗
Option 1: Browser
Open port 8000 in your Codespace. You should see:
"YOLO v11 WebApp created with FastAPI"
Navigate to /docs to see the interactive API documentation:
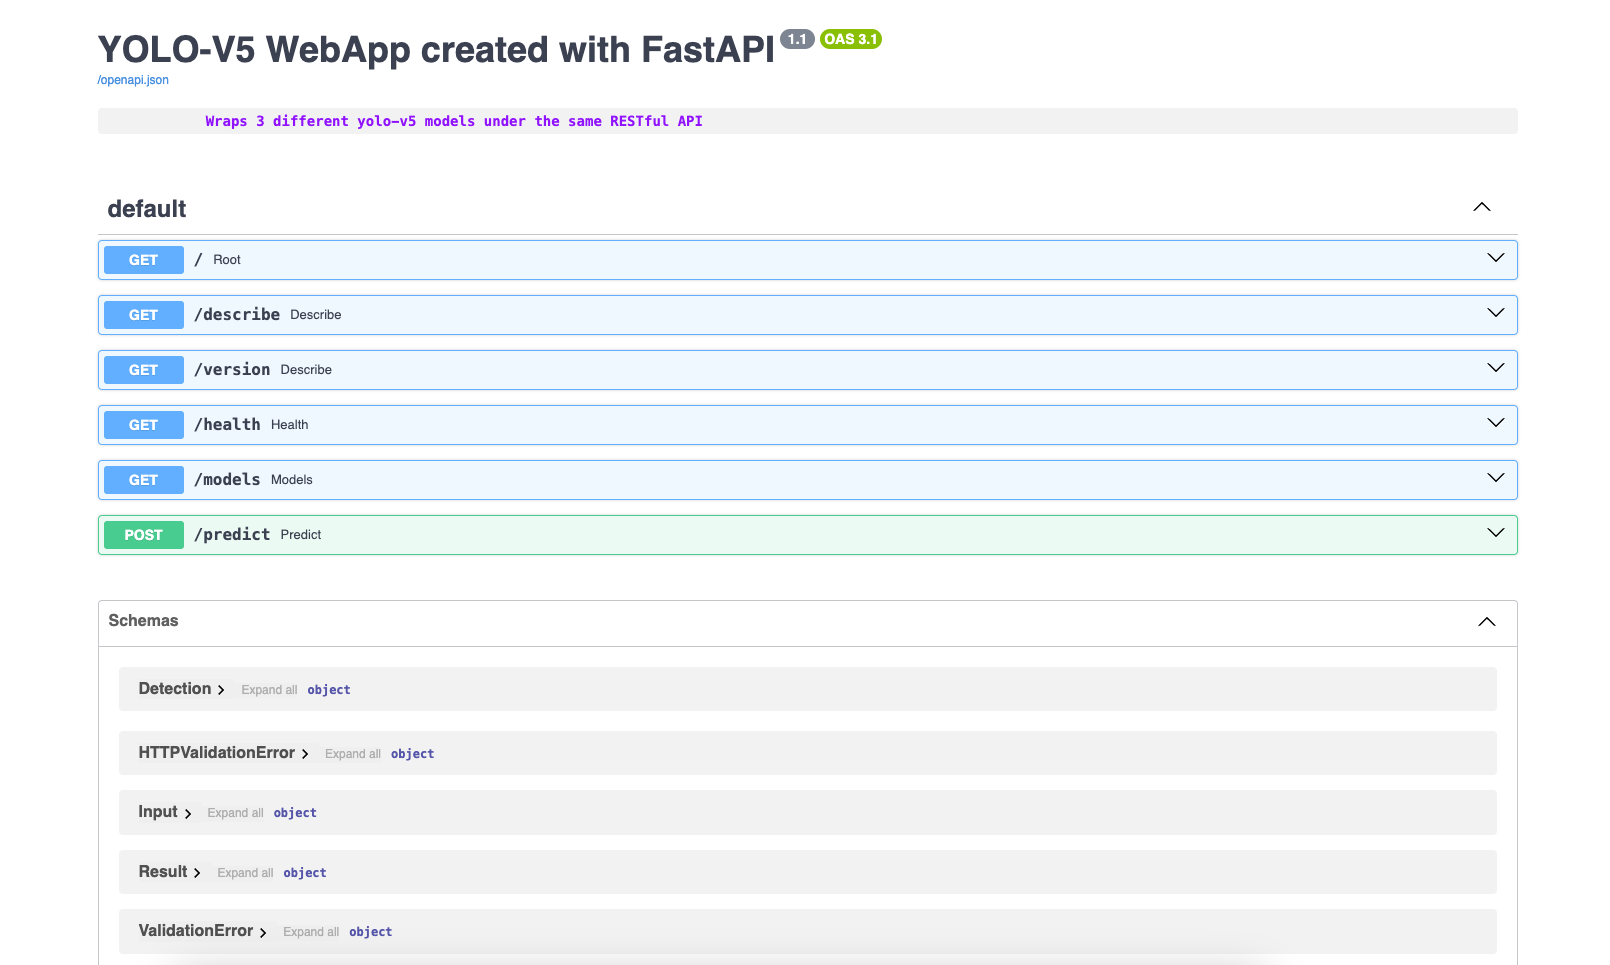
What is this /docs page?
This is Swagger UI, an industry-standard tool for exploring REST APIs. FastAPI automatically generates it from your Python code - no manual documentation needed!
The /docs page shows:
- All available routes and their HTTP methods
- Expected request format (what data to send)
- Response format (what you'll get back)
- A "Try it out" button to test endpoints directly in your browser
This follows the OpenAPI specification (formerly Swagger), a widely-adopted standard for describing REST APIs. Most production APIs provide similar documentation.
Option 2: Test script
In a new terminal, run the test script:
cd backend
python test_webapp.py
This sends test requests to the API and displays the detection results for cats.png.
Checkpoint
You should see test results and cat detections printed. Keep this container running for the next section.
4 - Understanding and Testing the Frontend🔗
Interacting with the backend via scripts isn't user-friendly. The frontend/ folder contains a Streamlit application that provides a visual interface.
Explore the code🔗
Open frontend/app.py and look for:
- The backend URL configuration (user can change it in the UI)
- The "IS ALIVE" button - calls
/healthto check if the backend is reachable - The image upload widget and "PREDICT" button - sends the image to
/predict
Run the frontend locally🔗
Open a new terminal (keep the backend running in the first one):
docker run --rm -p 8501:8501 --network="host" europe-docker.pkg.dev/isae-sdd-481407/isae-sdd-de-2526-docker/yolo-v11-frontend:1.0
Why --network=\"host\"?
This lets the frontend container access localhost:8000 where the backend is running. Without it, containers are on isolated networks and cannot communicate.
Test the full flow🔗
- Open port 8501 in your Codespace
- The backend URL should default to
http://localhost:8000 - Click "IS ALIVE" - should confirm the backend is reachable
- Upload an image (try one with people, cars, or animals)
- Click "PREDICT" - you should see detection boxes drawn on the image

Checkpoint
You can now send images through the frontend and see YOLO detections. Stop both containers (Ctrl+C in each terminal) before continuing.
5 - Multi-Container Orchestration with docker-compose🔗
Running two containers manually works, but it's tedious:
- Two terminals to manage
- Remember port mappings for each service
- Handle networking between containers
- Start and stop each individually
Imagine an application with 5 containers...
The solution: docker-compose🔗
Docker Compose lets you define all services in a single YAML file and manage them with one command.
Open docker-compose.yml:
version: '3'
services:
  yolo:
    image: "europe-docker.pkg.dev/isae-sdd-481407/isae-sdd-de-2526-docker/yolo-v11-backend:1.0"
    ports:
      - "8000:8000"
    hostname: yolo
  streamlit:
    image: "europe-docker.pkg.dev/isae-sdd-481407/isae-sdd-de-2526-docker/yolo-v11-frontend:1.0"
    ports:
      - "8501:8501"
    hostname: streamlit
Key benefits:
- Both services start with one command
- They automatically share a network (no
--network="host"needed) - Services can reach each other by hostname (
yolo,streamlit)
Run with docker-compose🔗
docker-compose up
Both services start and logs are interleaved in your terminal.
Test the application🔗
- Open port 8501 in your Codespace (frontend)
- Set the backend URL to
http://yolo:8000(use the hostname, not localhost) - Test "IS ALIVE" and run a prediction
Hostname vs localhost
When using docker-compose, services communicate via their hostnames defined in the YAML file. Use http://yolo:8000, not http://localhost:8000.
Stop the services🔗
docker-compose down
docker-compose vs Kubernetes
docker-compose is great for local development and simple deployments. For production at scale, orchestrators like Kubernetes provide service discovery, load balancing, and self-healing across multiple machines.
6 - Deploying to Google Cloud Run🔗
We've tested locally. Now let's deploy the backend to the cloud so anyone can access it with a real URL.
Why not deploy to a VM?
You could deploy to a VM using gcloud compute instances create-with-container as you learned in the previous session. However, this approach has limitations:
| Limitation | Problem |
|---|---|
| No domain name | You get a raw IP address like 35.205.x.x:8000 |
| No HTTPS | Traffic is unencrypted |
| Manual scaling | One VM handles all requests, or you manually add more |
| Always running | You pay even when nobody is using it |
| Infrastructure burden | Firewall rules, restarts, updates are your responsibility |
Cloud Run solves all of these automatically.
What is Cloud Run?🔗
Cloud Run is a fully managed platform for running containers. You provide a container image, Cloud Run handles everything else:
| Feature | What you get |
|---|---|
| Public URL | https://your-service-xxxxx.run.app |
| HTTPS | Automatic SSL certificate, no configuration |
| Scaling | Scales up with traffic, down to zero when idle |
| No infrastructure | No VMs, no firewall rules, no load balancer setup |
Deploy the backend🔗
Make sure gcloud is configured:
export PROJECT_ID=$(gcloud config get-value project 2> /dev/null)
export STUDENT_NAME="YOUR_NAME"  # Replace with your name (lowercase, no spaces)
echo "Deploying to project: ${PROJECT_ID}"
Deploy the YOLO backend:
gcloud run deploy yolo-backend-${STUDENT_NAME} \
    --image=europe-docker.pkg.dev/isae-sdd-481407/isae-sdd-de-2526-docker/yolo-v11-backend:1.0 \
    --platform=managed \
    --region=europe-west9 \
    --allow-unauthenticated \
    --port=8000 \
    --memory=4Gi
Replace YOUR_NAME
Replace YOUR_NAME with your name (lowercase, no spaces, e.g., jdupont)
Flags explained:
| Flag | Purpose |
|---|---|
--image |
The pre-built container image to deploy |
--platform=managed |
Use fully managed Cloud Run (not Kubernetes) |
--region=europe-west9 |
Deploy in Europe (close to users) |
--allow-unauthenticated |
Public access without login |
--port=8000 |
The port your container listens on |
--memory=4Gi |
YOLO model needs more RAM than default (max 4Gi for 1 CPU) |
Making the service public
The --allow-unauthenticated flag requires specific IAM permissions that students may not have (Editor role is not sufficient).
If you get a permission error, the service will deploy but remain private. Ask the instructor to make it public:
- Go to Cloud Run Console
- Click on your service
- Go to Security tab → Authentication → Select Allow unauthenticated invocations
Alternatively, the instructor can run:
gcloud run services add-iam-policy-binding yolo-backend-${STUDENT_NAME} \
    --region=europe-west9 \
    --member="allUsers" \
    --role="roles/run.invoker"
Get your service URL🔗
After deployment completes, gcloud displays the service URL:
Service URL: https://yolo-backend-xxxxx-ew.a.run.app
Test the deployed backend:
- Open the URL in your browser - you should see the FastAPI welcome message
- Add
/docsto the URL - you should see the interactive API documentation
Checkpoint
Your backend is now running in the cloud with a real HTTPS URL. Anyone on the internet can access it.
Connect your local frontend to the cloud backend🔗
Now run the frontend locally, pointing to your Cloud Run backend:
docker run --rm -p 8501:8501 europe-docker.pkg.dev/isae-sdd-481407/isae-sdd-de-2526-docker/yolo-v11-frontend:1.0
Note: No --network="host" needed - we're connecting to the internet, not localhost.
- Open port 8501 in your Codespace
- Set the backend URL to your Cloud Run URL (e.g.,
https://yolo-backend-xxxxx-ew.a.run.app) - Click "IS ALIVE" - should confirm the cloud backend is reachable
- Upload an image and run a prediction
Your request now travels from your Codespace, through the internet, to Google's infrastructure, runs inference on the YOLO model, and returns the results.
Scaling (preview)
Cloud Run can automatically scale based on traffic - spinning up more instances when busy, scaling to zero when idle. We'll explore these settings in a future session. For now, the defaults work well.
7 - Conclusion🔗
Congratulations!
You have deployed your first ML model to production with a real HTTPS URL!
What you learned🔗
| Concept | What you did |
|---|---|
| APIs | Understood REST endpoints (POST /predict, GET /health) |
| Microservices | Separated frontend and backend into independent containers |
| docker-compose | Orchestrated multiple containers locally with one command |
| Cloud Run | Deployed a container and got a public HTTPS URL instantly |
Architecture you built🔗
┌─────────────────────┐              ┌──────────────────────────────┐
│  Local (Codespace)  │              │       Google Cloud Run       │
│                     │              │                              │
│  ┌───────────────┐  │    HTTPS     │  ┌────────────────────────┐  │
│  │   Frontend    │──┼─────────────>│  │   Backend (YOLO API)   │  │
│  │  (Streamlit)  │  │              │  │                        │  │
│  └───────────────┘  │              │  │  yolo-backend-xxx.run  │  │
│                     │              │  └────────────────────────┘  │
└─────────────────────┘              └──────────────────────────────┘
Cleanup🔗
Delete your Cloud Run service to avoid any charges:
gcloud run services delete yolo-backend-${STUDENT_NAME} --region=europe-west9 --quiet
Don't forget!
Always clean up cloud resources when you're done. Cloud Run has a generous free tier, but it's good practice to delete unused services.
What's next🔗
- Scaling: Configure min/max instances and concurrency limits
- CI/CD: Automatically deploy when you push to git
- Custom domains: Use your own domain instead of
.run.app - Full deployment: Deploy the frontend to Cloud Run too