Bureau d'études GCP - ML Workflow🔗
Warning
Ensure that you are running on the latest codespace which was updated today. Do not use previous codespace of the last day of classes.
0. Overview🔗
Abstract
In this hands-on, you will learn a core data science workflow: offloading compute-intensive training to a cloud VM while keeping your development environment lightweight.
You will:
- Create a VM on Google Compute Engine with PyTorch installed via startup script
- Run PyTorch training remotely via SSH
- Upload results to Google Cloud Storage
- Pull results back to your Codespace for analysis
Cost Warning
GCP resources cost money.
CRITICAL: Always verify training is complete before deleting your VM, then delete it immediately. Leaving a VM running overnight wastes money and your free credits.
Tip
When replacing {something} in commands, don't include the brackets.
Write yourname, not {yourname}.
The Problem🔗
Your GitHub Codespace has 2 CPU cores and 8GB RAM. You need to train a CNN on MNIST - doable locally, but imagine this was a ResNet on ImageNet. How do data scientists handle compute-intensive training when their laptop or dev environment isn't enough?
The solution: Offload training to a cloud VM, save results to cloud storage, pull back for analysis.
The Workflow🔗
┌─────────────────┐         ┌─────────────────┐         ┌─────────────────┐
│    CODESPACE    │         │    GCE VM       │         │      GCS        │
│  (your laptop)  │         │ (training box)  │         │ (cloud storage) │
└────────┬────────┘         └────────┬────────┘         └────────┬────────┘
         │                           │                           │
         │  1. Create VM             │                           │
         │ ─────────────────────────>│                           │
         │                           │                           │
         │  2. SSH + run training    │                           │
         │ ─────────────────────────>│                           │
         │                           │  3. Upload model+metrics  │
         │                           │ ─────────────────────────>│
         │                           │                           │
         │  4. Delete VM             │                           │
         │ ─────────────────────────>│                           │
         │                           │                           │
         │  5. Pull results from GCS                             │
         │ <─────────────────────────────────────────────────────│
         │                           │                           │
         │  6. Analyze in Jupyter    │                           │
         ▼                           │                           │
   ┌──────────┐                      │                           │
   │ Notebook │                      │                           │
   └──────────┘                      │                           │
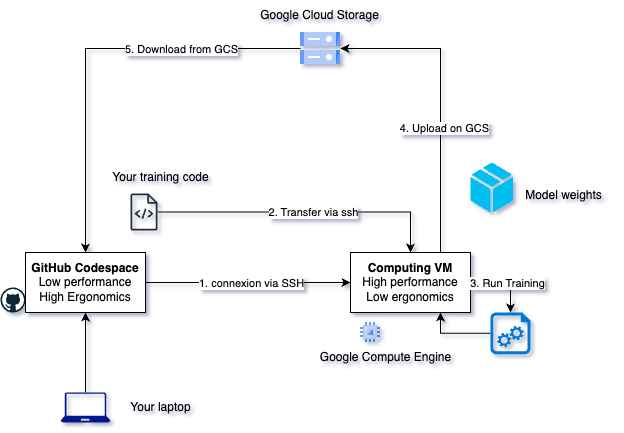
Here's the same workflow as a diagram:
Prerequisites🔗
Before starting, you should have:
- Completed the GCP Hands-on (gcloud configured, project access)
- Access to the GitHub Codespace
1. Key Concepts🔗
Before diving in, let's understand the two GCP services we'll use.
What is Google Compute Engine (GCE)?
Google Compute Engine (GCE) is GCP's virtual machine service. You can:
- Create VMs with specific CPU, RAM, and disk configurations
- Choose from various OS images (Debian, Ubuntu, etc.) and customize with startup scripts
- Pay only for the time the VM is running (billed per second)
- Access VMs via SSH from anywhere
Think of it as renting a computer in Google's data center. You control it entirely, but Google handles the physical hardware, networking, and maintenance.
Key difference from your laptop: GCE VMs are ephemeral—designed to be created, used, and deleted. Don't treat them as permanent storage.
What is Google Cloud Storage (GCS)?
Google Cloud Storage (GCS) is GCP's object storage service. You can:
- Store any file (models, datasets, logs) in "buckets"
- Access files from anywhere (VMs, your laptop, other GCP services)
- Pay only for storage used and data transferred
- Files persist until you delete them—independent of any VM
Think of it as a cloud hard drive with unlimited capacity. Unlike a VM's disk, GCS data survives VM deletion.
Why use GCS for ML? Your trained model and metrics live in GCS, so you can delete the expensive VM immediately after training and still have all your results.
2. Setup🔗
Set Environment Variables🔗
We'll create an environment file that you can source whenever you need these variables—this way you won't lose them if your terminal closes.
Create a file called env.sh in the be-cloud-computing/ folder with the following content:
# === FILL THESE VALUES ===
export YOUR_NAME="your-firstname-lastname"  # e.g., "jean-dupont" (no spaces, lowercase)
export RUN_ID="${YOUR_NAME}-run1"            # increment to run2, run3 if you redo the exercise

# === DO NOT MODIFY BELOW ===
export PROJECT_ID=$(gcloud config get-value project 2> /dev/null)
export GCS_BUCKET="gs://isae-sdd-de-2526"
export INSTANCE_NAME="training-vm-${RUN_ID}"
export GCS_OUTPUT="${GCS_BUCKET}/runs/${RUN_ID}"

# Display configuration
echo "Project: ${PROJECT_ID}"
echo "Run ID: ${RUN_ID}"
echo "Instance: ${INSTANCE_NAME}"
echo "Results will be saved to: ${GCS_OUTPUT}"
Then source it:
source env.sh
Recovering your environment
If your terminal closes or you open a new one, just run source env.sh again to restore all your variables.
Navigate to the workshop folder🔗
cd be-cloud-computing
Verify Bucket Access🔗
The shared bucket is pre-created by the instructor. Verify you can access it:
# The bucket already exists - verify you can access it
gcloud storage ls ${GCS_BUCKET}
Checkpoint 1
After sourcing env.sh, you should see your Project ID, Run ID, Instance name, and GCS path printed.
The bucket listing should work (may be empty or have other students' runs).
If you get a permission error, check with the instructor.
3. Create VM and Run Training🔗
Create the VM🔗
Create a file called create_vm.sh with the following content:
#!/bin/bash
set -e

# Source environment variables
source env.sh

echo "Creating VM: ${INSTANCE_NAME}..."

gcloud compute instances create ${INSTANCE_NAME} \
    --zone=europe-west9-a \
    --image-family=debian-12 \
    --image-project=debian-cloud \
    --machine-type=e2-standard-2 \
    --scopes=storage-rw \
    --boot-disk-size=50GB \
    --metadata=startup-script='#!/bin/bash
apt-get update
apt-get install -y python3-pip python3-venv
python3 -m venv /opt/venv
/opt/venv/bin/pip install torch torchvision --index-url https://download.pytorch.org/whl/cpu
/opt/venv/bin/pip install google-cloud-storage'

echo "VM created. Wait ~2 minutes for PyTorch installation."
Make it executable and run it:
chmod +x create_vm.sh
./create_vm.sh
Why a script?
Copy-pasting long commands is error-prone. A script is reusable and you can see exactly what it does.
Key flags explained:
| Flag | Purpose |
|---|---|
--image-family=debian-12 |
Standard Linux image |
--metadata=startup-script |
Installs PyTorch automatically at boot |
--scopes=storage-rw |
VM can write to GCS without extra auth |
--machine-type=e2-standard-2 |
2 vCPUs, 7.5 GB RAM |
Wait for setup
The VM needs ~2 minutes after creation for the startup script to install PyTorch.
You can check progress with: gcloud compute ssh ${INSTANCE_NAME} --zone=europe-west9-a --command="tail /var/log/syslog | grep startup-script"
Checkpoint 2
VM creation takes a few seconds, then wait a few minutes for PyTorch installation. Run gcloud compute instances list - your VM should show RUNNING status.
Copy Files to the VM🔗
Transfer both the training script and your environment file:
gcloud compute scp train.py env.sh ${INSTANCE_NAME}:~ --zone=europe-west9-a
SSH into the VM and Run Training🔗
gcloud compute ssh ${INSTANCE_NAME} --zone=europe-west9-a
Once inside the VM, source your environment file and run training:
# Load your environment variables
source ~/env.sh

# Activate the virtual environment (PyTorch is installed here)
source /opt/venv/bin/activate

# Run training with nohup (continues if SSH disconnects)
nohup python train.py \
    --epochs 5 \
    --output-gcs ${GCS_OUTPUT} \
    > training.log 2>&1 &

# Monitor progress
tail -f training.log
# Press Ctrl+C to stop watching (training continues in background)
Why activate the venv?
The startup script installed PyTorch into /opt/venv. You must activate this environment to access python with PyTorch installed.
Why nohup?
If your SSH connection drops (network hiccup, laptop sleeps), the training process continues. Without nohup, a disconnection would kill your training mid-run.
For longer interactive sessions, you could also use tmux which you learned about earlier.
Checkpoint 3
Training is complete when you see Results uploaded to gs://... in the log.
Exit SSH with exit.
4. Verify Completion, Cleanup & Retrieve Results🔗
Verify Training Completed🔗
CRITICAL: Verify before deleting!
Never delete your VM until you've confirmed results are in GCS. Once deleted, any data on the VM is gone forever.
From your Codespace (not the VM), check if results exist:
# Check if results exist in GCS (training script uploads on completion)
gcloud storage ls ${GCS_OUTPUT}/metrics.json
If you see the file listed, training is complete. If you get "One or more URLs matched no objects", training is still running.
Wait for completion (if needed):
# Poll until metrics.json appears (check every 30 seconds)
while ! gcloud storage ls ${GCS_OUTPUT}/metrics.json 2>/dev/null; do
    echo "$(date): Training still in progress..."
    sleep 30
done
echo "Training complete! Results ready in ${GCS_OUTPUT}"
Checkpoint 4
You should see gs://isae-sdd-de-2526/runs/yourname-YYYYMMDD-HHMMSS/metrics.json listed.
List All Results🔗
gcloud storage ls ${GCS_OUTPUT}/
Expected output:
gs://isae-sdd-de-2526/runs/yourname-20260111-143052/model.pt
gs://isae-sdd-de-2526/runs/yourname-20260111-143052/metrics.json
Pull Results to Codespace🔗
mkdir -p ./results/${RUN_ID}
gcloud storage cp ${GCS_OUTPUT}/* ./results/${RUN_ID}/
Checkpoint 5
Run ls ./results/${RUN_ID}/ - you should see model.pt and metrics.json.
Delete the VM🔗
Only after verifying results are in GCS!
gcloud compute instances delete ${INSTANCE_NAME} --zone=europe-west9-a --quiet
Checkpoint 6
Run gcloud compute instances list - your VM should no longer appear.
5. Analyze Results in Jupyter🔗
Open the analyze.ipynb notebook in your Codespace.
Cell 1: Load Metrics🔗
import json
import os
import matplotlib.pyplot as plt

# Find the most recent run (or specify RUN_ID manually)
results_dir = "./results"
runs = sorted(os.listdir(results_dir))
run_id = runs[-1]  # Most recent run
run_path = os.path.join(results_dir, run_id)
print(f"Analyzing run: {run_id}")

with open(os.path.join(run_path, "metrics.json")) as f:
    metrics = json.load(f)

print(f"Final accuracy: {metrics['test_accuracy'][-1]:.2f}%")
print(f"Final loss: {metrics['test_loss'][-1]:.4f}")
Cell 2: Plot Training Curves🔗
fig, (ax1, ax2) = plt.subplots(1, 2, figsize=(12, 4))

ax1.plot(metrics['epoch'], metrics['test_loss'])
ax1.set_xlabel('Epoch')
ax1.set_ylabel('Loss')
ax1.set_title('Test Loss over Training')

ax2.plot(metrics['epoch'], metrics['test_accuracy'])
ax2.set_xlabel('Epoch')
ax2.set_ylabel('Accuracy (%)')
ax2.set_title('Test Accuracy over Training')

plt.tight_layout()
plt.savefig(os.path.join(run_path, 'training_curves.png'))
plt.show()
Cell 3: Inspect Model🔗
import torch
model_state = torch.load(os.path.join(run_path, 'model.pt'), map_location='cpu')
print(f"Model layers: {list(model_state.keys())}")
print(f"Total parameters: {sum(p.numel() for p in model_state.values()):,}")
Checkpoint 7 (Final)
You should see training curves plotted and ~93-98% accuracy after 5 epochs.
6. Summary🔗
What You Learned
- Cloud VMs for ML: Create VMs with startup scripts to install ML frameworks
- Remote training pattern: SSH → run → upload to GCS → delete VM
- GCS as artifact storage: Durable, accessible from anywhere, decoupled from compute
- Cloud workflow: Compute is ephemeral, storage is persistent
7. Bonus: Automation Script🔗
You've already created the building blocks (env.sh, create_vm.sh). This bonus section shows how to combine everything into a single fully automated script.
Here's what a fully automated train_remote.sh looks like:
#!/bin/bash
set -e  # Exit on any error

# Configuration
GCS_BUCKET="gs://isae-sdd-de-2526"
RUN_ID="${YOUR_NAME}-$(date +%Y%m%d-%H%M%S)"
INSTANCE_NAME="training-vm-${RUN_ID}"
ZONE="europe-west9-a"
GCS_OUTPUT="${GCS_BUCKET}/runs/${RUN_ID}"
EPOCHS=${1:-5}  # Default 5 epochs, or pass as argument

echo "==> Run ID: ${RUN_ID}"
echo "==> Results will be saved to: ${GCS_OUTPUT}"

echo "==> Creating VM ${INSTANCE_NAME}..."
gcloud compute instances create ${INSTANCE_NAME} \
    --zone=${ZONE} \
    --image-family=debian-12 \
    --image-project=debian-cloud \
    --machine-type=n1-standard-2 \
    --scopes=storage-rw \
    --boot-disk-size=50GB \
    --metadata=startup-script='#!/bin/bash
apt-get update
apt-get install -y python3-pip python3-venv
python3 -m venv /opt/venv
/opt/venv/bin/pip install torch torchvision --index-url https://download.pytorch.org/whl/cpu
/opt/venv/bin/pip install google-cloud-storage'

# Wait for SSH and PyTorch installation
echo "==> Waiting for VM and PyTorch installation (~2 minutes)..."
sleep 30  # Initial wait for VM boot
until gcloud compute ssh ${INSTANCE_NAME} --zone=${ZONE} --command="test -f /opt/venv/bin/python" 2>/dev/null; do
    echo "    Waiting for PyTorch installation..."
    sleep 10
done

echo "==> Copying training script..."
gcloud compute scp train.py ${INSTANCE_NAME}:~ --zone=${ZONE}

echo "==> Starting training in background..."
gcloud compute ssh ${INSTANCE_NAME} --zone=${ZONE} --command \
    "source /opt/venv/bin/activate && nohup python train.py --epochs ${EPOCHS} --output-gcs ${GCS_OUTPUT} > training.log 2>&1 &"

# Poll for completion by checking if metrics.json exists in GCS
echo "==> Waiting for training to complete..."
while ! gcloud storage ls ${GCS_OUTPUT}/metrics.json &> /dev/null; do
    echo "    $(date): Training in progress..."
    sleep 30
done

echo "==> Training complete! Deleting VM..."
gcloud compute instances delete ${INSTANCE_NAME} --zone=${ZONE} --quiet

echo "==> Done! Results at ${GCS_OUTPUT}"
echo "==> Download with: gcloud storage cp ${GCS_OUTPUT}/* ./results/${RUN_ID}/"
Now launching a training run is one command:
./train_remote.sh 10 # Train for 10 epochs
This is how reproducible ML pipelines start. Tools like Terraform and Pulumi formalize this further, letting you version control your infrastructure alongside your code.
8. Looking Ahead: MLOps🔗
You just did manually what MLOps platforms automate:
| What You Did | Production Tools |
|---|---|
| Create VM, run training | Vertex AI (GCP), SageMaker (AWS) |
| Track metrics.json | MLflow, Weights & Biases |
| Script the workflow | Kubeflow, Airflow |
The pattern you learned is the foundation—cloud platforms add automation on top.